 By Emily Parker
Updated November 2026
An accessories organizer for travel keeps chargers, cables, adapters, toiletries, small medications and other loose items in one place so nothing gets lost in the bottom of a bag. In this guide, you will learn how to pick the right organizer for your trip length, sort your accessories into zones, pack the organizer so it stays neat in transit, and avoid the mistakes that make most travel organizers useless after the first day.
Why an Accessories Organizer for Travel Pays Off
Most packing stress comes from small items. A single missing USB cable can mean a dead phone at the airport gate, and a loose adapter can end up tangled in a sweater halfway across the country. A dedicated organizer gives every small item a fixed home, which means you spend less time searching and less time repacking. It also protects fragile items like earbuds and SIM ejector tools from being crushed under heavier gear.
Shopping for one? See our guide: 3 Best Travel Photography Accessories for Better Trip Photos (2026).
The organizer does not need to be fancy. It needs to match how you travel. A weekend trip with a phone, one charger and a toothbrush needs a very different setup from a three-week trip with a laptop, camera, two adapters and prescription medication.
Step 1: Choose the Right Type of Organizer
Before you buy or pack anything, decide which format suits your trips. Most accessories organizers fall into four types, and each one handles a different load.
| Organizer type | Best for | Typical strengths | Limitations |
|---|---|---|---|
| Zippered pouch (single compartment) | Short trips, minimal electronics | Light, simple to toss in a bag | Items shift and tangle |
| Multi-pocket cable organizer | Tech-heavy trips | Separates chargers, cables and adapters | Bulkier, less room for non-tech items |
| Hanging toiletry or accessory kit | Hotel stays, road trips | Hangs on hooks, easy to see everything | Needs a hook or door hanger |
| Hard-shell case with dividers | Fragile gear, long or multi-leg trips | Protects electronics and glasses | Takes up more space |
If you are unsure where to start, a multi-pocket pouch with a clear front panel works for most people. It is easy to scan, lightweight and fits inside a carry-on or personal item.
Step 2: Inventory What You Actually Carry
Lay out every small item you plan to bring. Group them into categories before you open the organizer. This step prevents the common problem of buying an organizer that is too small or too large for the real load.
- Power: phone charger, laptop charger, power bank, spare cables.
- Adapters: travel plug adapter for each destination, USB wall adapter, voltage converter if your devices need one.
- Audio and eyewear: earbuds and case, sunglasses case, spare glasses or contact lens supplies.
- Health: daily medications, pain reliever, bandages, antiseptic wipes.
- Documents and cards: passport holder, boarding pass sleeve, card holder, small notebook.
- Personal care: travel-size toothbrush and paste, deodorant, hair ties, small comb.
- Misc: SIM ejector tool, luggage tag, zip ties, small sewing kit, earplugs, eye mask.
Count how many items fall in each group. That count tells you how many pockets or compartments you need. For example, if you carry three cables, two adapters and a power bank, you need at least one large pocket and two smaller ones for power gear.
Measure Before You Buy
Check the internal dimensions of any organizer you are considering, not just the outer size. Pocket depth matters more than total length for cables and small tools. A pocket that is 4 inches deep will hold a standard cable roll, while a 2-inch pocket will not. Also measure your carry-on’s side pocket or personal item compartment so the organizer fits without forcing the zipper.
Step 3: Sort Items by Use Frequency
Organize the pockets based on how often you reach for each item. Items you use daily, such as your phone cable, earbuds and medication, belong in the front or top pocket. Items you use occasionally, like a spare adapter or sewing kit, go in the back or bottom.
A simple zoning method works well:
- Zone A (front, easy access): phone cable, earbuds, daily medication, hand sanitizer.
- Zone B (middle): chargers, power bank, adapters.
- Zone C (back or inner pocket): backup cables, first-aid basics, sewing kit, SIM tool.
Keep liquids out of the main organizer unless they are sealed in a leak-proof container. Put any liquid medication or lotion in a separate clear bag that you can check at security.
Use Cable Ties and Labels
Wrap each cable with a reusable hook-and-loop tie or a short zip tie, then label the tie with a small tag. Labels save you from unplugging the wrong cable at a hotel nightstand. Label your adapters with the region they cover, such as “UK” or “EU,” since many look alike.
Step 4: Pack the Organizer So It Stays Put
An organizer that shifts in transit leaves items scattered at the bottom of the bag. Pack it in the most stable spot, usually the center of your carry-on or the middle of a personal item bag, and surround it with soft clothing.
- Zip the organizer fully and check that every pocket closes.
- Place it upright in your bag so the front pocket faces the top opening.
- Fill any gaps around it with rolled socks or a folded sweater so the organizer cannot slide.
- Keep a second, very small pouch in your jacket or day bag for items you need during the flight, such as earbuds and a charger.
Before a flight, move the organizer from your checked bag to your carry-on if it holds chargers, batteries or medication. Lithium batteries, including spare power banks, generally must stay in carry-on baggage under current US airline and TSA rules, so check the latest guidance before you fly.
Step 5: Set Up at Your Destination
Unpack the organizer as soon as you reach your room. Place it in a consistent spot, such as the same corner of the desk or the same shelf in a rental. Consistency means you always know where the charger is, even in an unfamiliar room.
If you are staying in a hotel, hang a fabric organizer on the back of the bathroom door or on a bed-side hook. If you are in a rental with limited surfaces, set the organizer on the nightstand and keep only your charging gear out.
For a broader packing plan that covers clothes and toiletries alongside accessories, see Travel Toiletries & Accessories: What to Pack and How to Organize It. If your trip includes a long flight, Travel Accessories for Flying: 9 Essentials for a Smoother Trip lists items that help during the journey itself.
Tips for Making Your Organizer Work Harder
- Keep a “core kit” that stays in the organizer permanently, then add trip-specific items for each journey.
- Restock after every trip. Check the pockets when you return and replace any empty or damaged items.
- Use a clear pouch for small items if you tend to forget what you have. Seeing everything at a glance saves time.
- Pack a small zip bag for tiny parts like SIM tools, clips and spare buttons. These are the items most likely to disappear.
- If you travel internationally, keep a printed list of plug types and voltages for each destination inside the organizer.
Common Mistakes to Avoid
- Overpacking the organizer. A stuffed organizer is hard to close and harder to search. If it does not zip easily, remove the least-used items.
- Mixing liquids with electronics. A leaking bottle can ruin chargers and cables. Keep liquids sealed in their own bag.
- Forgetting adapters for each destination. A single universal adapter is not always enough. Check the plug type for every country on your itinerary.
- Buying by outer size only. Pocket depth and internal layout matter more than the total dimensions on the label.
- Leaving the organizer unlabeled. In a dim hotel room, unlabeled cables and adapters cost time and frustration.
- Putting batteries in checked luggage. Spare lithium batteries generally belong in carry-on baggage. Check your airline’s rules before departure.
Recommended gear
These product types help most travelers keep an accessories organizer tidy and functional. Search Amazon for the phrase below to compare sizes and layouts.
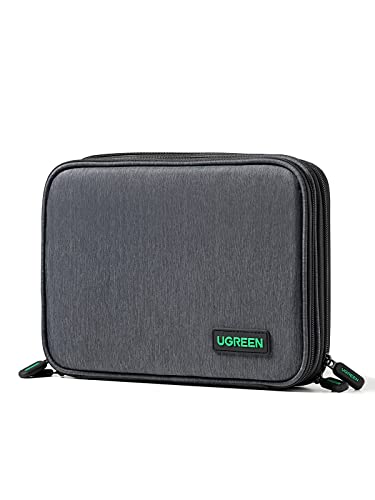
- Multi-pocket cable organizer pouch: Separate pockets keep chargers, cables and adapters from tangling, and a clear front panel makes it easy to spot the item you need. View on Amazon
- Reusable hook-and-loop cable ties: These secure cables without the damage that tight zip ties can cause, and you can reuse them trip after trip. View on Amazon
- Universal travel adapter with USB ports: A single adapter with multiple outlets and USB ports reduces how many pieces you need to organize, though you should confirm it covers your destination’s plug type. View on Amazon
- Small hard-shell electronics case: A rigid case protects earbuds, memory cards and small drives from crushing when the organizer sits under heavier items. View on Amazon
FAQ
What size accessories organizer is best for carry-on travel?
For most carry-on trips, an organizer about 8 to 10 inches long and 5 to 6 inches tall fits easily into a personal item or the side pocket of a carry-on. Measure your bag’s pocket before buying to confirm the fit.
Can I bring an accessories organizer on a plane?
Yes. Organizers and their contents are generally allowed in carry-on and checked bags. Lithium batteries, including spare power banks, must generally stay in carry-on baggage. Check the TSA website and your airline before you fly for current rules.
How do I keep cables from tangling in the organizer?
Wrap each cable with a reusable tie or loop it neatly, then place it in its own pocket. Label the tie if you carry several cables of similar length.
Should I put medication in the accessories organizer?
You can keep daily medication in a small section, but keep it in its original labeled container. Carry prescription medication in your carry-on, and consult your doctor or pharmacist about how to pack it for your trip, especially for international travel.
How many adapters should I pack for an international trip?
Pack one adapter for each plug type you will encounter. Many trips need only one, but if you are visiting several countries with different plug types, a universal adapter often covers more than one region.
What is the difference between a travel organizer and a toiletry bag?
A travel organizer focuses on electronics, small tools and accessories, while a toiletry bag holds liquids, personal care products and grooming items. Many travelers use both to keep their gear separate.
How often should I clean my accessories organizer?
Empty and wipe it down after each trip, and check for crumbs, sand or leaked product. If you carry medication or liquids, inspect for spills more often. Air it out completely before storing it to avoid odor and mold.
Conclusion
A good accessories organizer for travel keeps your small items sorted, protected and easy to find. Choose a format that suits your trip length, sort items by how often you use them, and pack the organizer so it stays steady in transit. Restock and clean it after each trip so it is ready for the next one.
Related reading
- iPhone Camera Accessories for Travel: 9 Picks for Better Trip Photos
- Women's Travel Accessories Luxury: 9 Essentials Worth Packing (2026)
- Wandering Moon Travel Accessories: What They Are and How to Use Them
- Unique Travel Accessories for Men: 9 Picks Worth Packing (2026)
Ready to choose one?
About Emily Parker
Emily Parker is part of our editorial team and reviews and edits our travel essentials & packing lists guides, checking product details against manufacturer specifications and owner feedback.